# Welcome to Elementor Pay Addons
## **Thank you for choosing Pay Addons!**
Pay Addons is a powerful payment plugin for WordPress that seamlessly integrates [**Elementor**](https://elementor.com/) and [**Stripe**](https://stripe.com/). It's specifically designed to simplify payment management for website owners without requiring complex coding or technical knowledge.
By powered by stripe, you would gain access to an extensive range of payment methods including Alipay, WeChat Pay, iDeal, SEPA, SOFORT, and more. Additionally, you can easily support one-time and recurring payments in over 35 countries and 135 currencies.
This documentation contains starter guides to help you quickly and easily integrate the Pay Addons plugin into your WordPress website.
## Quick links
{% content-ref url="/pages/zGChP5lh4e8qJ6p4ARqp" %}
[Prerequisites](/getting-started/prerequisites)
{% endcontent-ref %}
{% content-ref url="/pages/lkxkAyXAoL5MqL2KyYNm" %}
[Installation](/getting-started/installation)
{% endcontent-ref %}
{% content-ref url="/pages/aSXXwJ4bQmluUUrclqFt" %}
[Settings](/getting-started/settings)
{% endcontent-ref %}
## Get Started With Elements
We've put together some helpful guides for you to get set up with the payment widgets quickly and easily.
{% content-ref url="/pages/e3VW7oIKBYV3XvxlW6w8" %}
[Checkout Button](/elements/checkout-button)
{% endcontent-ref %}
{% content-ref url="/pages/dWut1p4tQQ8wMmWP2PlP" %}
[Confirmation Summary](/elements/confirmation-summary)
{% endcontent-ref %}
{% content-ref url="/pages/zkYb8vsrfJzI72do7hZE" %}
[Price Table Checkout](/elements/price-table-checkout)
{% endcontent-ref %}
{% content-ref url="/pages/fp4XdQfWqsiyctUvwB8o" %}
[Checkout Credit Card Form (Pro)](/elements/checkout-credit-card-form-pro)
{% endcontent-ref %}
{% content-ref url="/pages/p8VsSDZs7gmhNirvnBwQ" %}
[Checkout Element Form (Pro)](/elements/checkout-element-form-pro)
{% endcontent-ref %}
{% content-ref url="/pages/nE0B7cXGKZ4xh4TEaWFB" %}
[Checkout Redirect Form (Pro)](/elements/checkout-redirect-form-pro)
{% endcontent-ref %}
## Get Started With Templates
Coming soon...
# Prerequisites
Before using Pay Addons, it is important to ensure that your WordPress environment includes the **Elementor** page builder plugin and a **Stripe** account. Pay Addons is a payment plugin that is designed to work with Elementor, and it is not compatible with other page builders or WordPress environments that do not have Elementor installed.
## **MINIMUM REQUIREMENTS**
WordPress 5.0 or greater
PHP version 7.0 or greater
MySQL version 5.0 or greater
## Elementor Website Builder (v3.2.0 or greater)
To install Elementor website builder, Log in to your WordPress dashboard and install the active version
## Stripe Account
In order to use this plugin, you must have a Stripe account. If you do not have one, you can [register a stripe account](https://dashboard.stripe.com/register) for free.
# Installation
1. Install using the WordPress built-in Plugin installer, or Extract the zip file and drop the contents in the `wp-content/plugins/` directory of your WordPress installation.
2. Activate the plugin through the ‘Plugins’ menu in WordPress.
3. Go to "Pages" > "Add New" to create a new page.
4. Click on the "Edit with Elementor" button to open the Elementor page builder.
5. Drag and drop the "Pay Addons" widget from the left panel onto the content area of your page.
6. Customize the payment options and settings for your page using the Pay Addons widget.
7. Save and publish your page to make it live on your website.
# Settings
General settings for plugin
After you’ve Install and activated the plugin, navigate to Dashboard > **Elementor Pay**
Before you start using the plugin, you need to ensure that you have a Stripe account set up.
### Stripe Restricted API Keys (recommended)
To integrate the plugin with Stripe, you’ll need Stripe API keys. Using your developer API keys directly is not recommended, as they include full permissions and could pose a security risk.
To help you generate API keys with minimal required permissions, we’ve created a Stripe App. Follow these steps:
1. **Install the App**: Visit the Stripe Marketplace and install the app here: [PayAddons App](https://marketplace.stripe.com/apps/payaddons).
2. **Access the App**:\
After installation, go to your installed apps list in the Stripe Dashboard: [Installed Apps](https://dashboard.stripe.com/settings/apps).
3. **Generate API Keys**:\
Click the **View API Keys** button in the app. This will generate a publishable key and a restricted key.
4. **Configure the Plugin**:\
Copy the generated publishable key and restricted key into the plugin settings. These keys will only have the permissions necessary for the plugin to function securely.
\
By using restricted API keys, you ensure that the plugin operates with the minimum required permissions, enhancing the security of your Stripe integration.
### Developer API Keys (Manual Setup)
If you prefer not to use the app to generate restricted API keys, you can manually create API keys directly from the Stripe Developer page. please follow this [link](https://stripe.com/docs/keys).
## Try a temporary Stripe API Key?
If you don't have a stripe account yet but still want to evaluate our plugin, you can simply click the **Import** button which will generate a temporary account from us. You can use it for short-term test purposes. However, since this key may limit some features and settings, we would recommend you to use your own key once you finish the evaluation.
## Use your own Stripe API Key
here's a step-by-step guide to help you obtain your Stripe API key:
1. **No account yet?** Sign up for a Stripe account: To get started, you'll need to create an account on the Stripe website. Go to stripe.com and click on the "Sign up" button in the top right corner of the page. Follow the prompts to create your account and provide any necessary information.
2. Login stripe dashboard with your new or existing account.
3. Navigate to the Developers section: Once you've logged in to your Stripe account, click on the "Developers" tab at the top of the screen. This will take you to the Stripe Developer Dashboard.
4. Access your API keys: In the Developer Dashboard, click on the "API Keys" link in the left-hand menu. Here, you'll see your Test API keys and Live API keys.
5. Copy your API key: To copy your API key, click on the "Reveal test key token" button (if you're using the Test API keys) or the "Reveal live key token" button (if you're using the Live API keys). Then, click on the "Copy" button to copy the key to your clipboard.
6. Use your API key: Now that you have your API key, you can use it to integrate Stripe with your website or application. Make sure to keep your API key secure and avoid sharing it with others.
And that's it! By following these steps, you should now have access to your Stripe API key and can start using it to process payments and manage your Stripe account.
> Stripe has two modes: Live & Test, make sure to use the proper mode
# Webhook Configuration
Webhooks allow Stripe to send messages back to your WordPress site. Setting up webhooks is required for some functionalities such as sending emails, creating subscription schedule (installment) plans
### What is a webhook?
Webhooks allow Stripe to send notifications to your website when certain events occur. For example, if a payment is refunded in Stripe, Stripe can automatically send a notification to your webhook to let your website know.
### Which features require a webhook?
* [x] Email notification
* [x] Transaction history status update
* [x] Delayed & Redirection payment methods (Sofort, PayPal, Alipay, etc)
* [x] Subscription schedule plan (occurrences)
### How to setup a webhook?
1. In your Stripe dashboard, click Developer -> [Webhooks](https://dashboard.stripe.com/webhooks), then click the Add endpoint button.
2. To get the endpoint URL, go back to the **Setting** tab in your WordPress dashboard and you should see a field labeled `Webhook URL`. Copy the URL or click the copy icon.
3. Paste the endpoint URL into the dialog box in your Stripe dashboard.
4. Add the below events to listener
```
checkout.session.completed
checkout.session.async_payment_succeeded
checkout.session.async_payment_failed
charge.succeeded
invoice.upcoming
invoice.payment_failed
invoice.payment_succeeded
payment_intent.payment_failed
payment_intent.succeeded
```
### Enable Webhook signatures (Strongly recommended)
Generating a signature for the webhook can greatly protect your endpoint from being abused by external parties.
In your Stripe dashboard, go to the webhook settings and click the `Signing secret` button to generate a signature.
Go back to plugin settings and paste to the webhook secret field in the **Settings** tab
### Webhook Connection Test
First of all, let's do some payments with our plugin under test mode, then go to the webhook URL and find any events such as a payment\_intent.succeeded. Now click the \`Resend\` button to trigger the event again.
If the response is 200 (OK), our plugin will process the event and display a connected status in the Webhook URL field.
# Checkout Button
A simple elementor button to redirect your customer to a stripe-hosting checkout page with multiple payment methods, one-time, recurring, coupon, stripe tax, etc.
Checkout Button is a payment element that allows customers to quickly and easily check out and complete their purchase. With Pay Addons, you can add a Checkout Button to any page on your WordPress website using the Elementor page builder.
* [x] Coupon, Stripe-Tax.
* [x] One-Time & Recurring Pay.
* [x] Using a secure Stripe-Hosting checkout page that can be customized with your Brand.
* [x] More payment methods, like EPS, Giropay, Sofort, iDeal, Alipay, Apple/Google Pay, WeChat.
* [x] More custom fields, such as user email, price, frequency, quantity, currency, product, etc.
{% hint style="info" %}
If you’re[^1] interested in setting up a Checkout Form, see [Checkout Form](/elements/checkout-credit-card-form-pro).
{% endhint %}
### Enable Payment Button
To use the Checkout Button widget in Pay Addons, you need to first enable it under the Elements tab.
Enabling the Checkout Button widget allows you to add a button to your website that customers can click to initiate the checkout process. This can help to simplify the checkout process and encourage more customers to complete their purchases. The widget is fully customizable, so you can adjust its appearance and behavior to fit your needs.
### Build Your Button
1. To get started, create a new page or post, and edit it using Elementor.
2. Next, drag and drop the **Checkout button** onto your page (you can search for it using the keyword "checkout" or find it under the "PAY-ADDONS" category)
3. Click on the button and customize the UI with Elementor as you wish.

### General Settings
Users can customize **Payment methods**, **Mode, Shipping Address,** and other options in the general settings tab.
{% hint style="info" %}
Make sure the Success and Cancel redirect url are specified, these fields are required
{% endhint %}
{% hint style="info" %}
The subscription mode is only available under Premium plan.
{% endhint %}
### One-time price settings
Choose mode as one-time
Price settings allow users to customize **Currency**, **Quantity** options, and more.
### Subscription price settings (Pro)
Subscription products can also be added through a simple button. Select "Subscription" in the mode option to display recurring payment settings.
The recurring fields include "**Number of intervals**" and "**Recurring frequency**." For example, to create a 3-month subscription at $99, set the amount to 99, the number of intervals to 3, and select "month" as the frequency.
#### Using Stripe Price
If you have more advanced configurations such as multiple currencies, tax codes, Statement descriptor, and different [pricing model ](https://docs.stripe.com/products-prices/pricing-models#flat-rate)such as Flat rate: Good-better-best, you can leverage the Stripe Built-in price & product.
#### Testing
After the configuration, click on the button, and you will be redirected to the stripe-hosting checkout page to finish the transaction.
{% hint style="info" %}
Success: 4242424242424242 Any 3 digits Any future date
Decline: 4000000000000002 Any 3 digits Any future date
For more testing cards sample, please refer
{% endhint %}
### Success page
After filling in the payment information and clicking the Subscribe button, we will be redirected to the Success page which is configured in the previous section. In the thank-you page, we can reuse our [Confirmation Summary](/elements/confirmation-summary) widget or customize the [receipt shortcode](/customize-confirmation-page-pro) to collect the payment receipt information
[^1]:
# Confirmation Summary
Use payment details, order details, custom message sections to create your Thank You page after a successful purchase redirect.
The Confirmation Summary is a payment element provided by Pay Addons that displays a summary of the user's payment details after they have completed a transaction. This summary typically includes information such as the item(s) purchased, the total amount paid, and any other relevant details related to the transaction.
{% hint style="info" %}
To fully customize your confirmation or thank-you page, refer to our [**Customize Confirmation Page (Pro)**](/customize-confirmation-page-pro) guide and utilize the receipt shortcode for a tailored experience.
{% endhint %}
To use the Confirmation Summary widget in Pay Addons, you need to first enable it under the Elements tab.
## Settings
The **Confirmation Message**, **Payment Details** and **Billing Details** can be customized through the widget settings, allowing users to choose the message content and how it is displayed.


### Configure Success URL
All of our elements and forms are designed to allow you to specify a success redirection. You can easily assign your confirmation page by setting it as the S**uccess redirect url** or **Return url**.
# Price Table Checkout
Advanced Price Table widget with checkout button.
We understand that all price table widgets in Elementor addons are well-designed. However, they only provide a link button and do not consider the checkout links anymore. Therefore, we have developed a widget that not only offers a fully Elementor-style price table but also integrates a checkout process action with our [checkout button](/elements/checkout-button).
### Getting Start
* To get started, create a new page or post, and edit it using Elementor.
* Next, drag and drop the **Price Table** onto your page (you can search for it using the keyword "checkout" or find it under the "PAY-ADDONS" category)
* Click on the price table and customize the UI with Elementor as you wish.

### Style Price Table
The editing price table is no different from other price tables such as Elementor Price Table, we can follow the same guide for the editing & styling.
### Handle the checkout button click
This is the only difference compared with other Price tables, which only provide the button link address, normally, user can generate a stripe checkout link in stripe dashboard and then paste it, however, it's always not convenient to create or modify the checkout setting like price in stripe dashboard side, so we move these settings from stripe side to here as the additional section **Checkout Settings** :


> The button link value can be # as it is.
### Testing
After the configuration, click on the button, and you will be redirected to the stripe-hosting checkout page to finish the transaction.
{% hint style="info" %}
Success: 4242424242424242 Any 3 digits Any future date
Decline: 4000000000000002 Any 3 digits Any future date
For more testing cards sample, please refer
{% endhint %}
# Custom Payment Form
Create Custom Payment Forms with Drag-and-Drop Simplicity
Don't have an Elementor Pro license? No problem. Our free form builder provides similar functionality to Elementor Pro's forms, enabling you to create professional payment forms with 10+ essential form fields and specialized payment elements.
### Creating Your Payment Form
1. Create a new post using the Elementor builder
2. Navigate to the **Pay Addon** category in the Elements panel
3. Locate the **Payment Form** element
4. Drag and drop it into your canvas
#### Adding Form Fields
Customize your form by adding fields that suit your needs. We currently support the following field types:
* **Basic Fields:** Text, Email, Textarea, URL, Password, Hidden, HTML
* **Numeric Fields:** Decimal, Number
* **Selection Fields:** Radio, Select, Checkbox
* **Date & Time Fields:** Date, Time
{% hint style="success" %}
Credit Card and Payment Elements are available in the premium version.
{% endhint %}
#### Styling Your Form
Our form builder offers complete customization control. You can adjust field sizes, button dimensions, and apply your own styling to match your brand identity perfectly.
### Configuring Payment Actions
Once your form structure is complete, configure how payments are processed when customers click the submit button.
**Available submission methods:**
* **Free Plan:** Checkout Redirection
* **Pro Plan:** Credit Card Submission, Payment Element Submission
Each submission method has its own configuration options.
### Stripe Checkout Redirect Configuration
In the Payment Action, we choose 'Checkout Redirect'. Once it's been selected, the two new sections will show up: Stripe Checkout Redirect and Stripe Checkout Redirect Fields.
#### Setting Up Checkout Redirect
Select **'Checkout Redirect'** in the Payment Action settings. This will reveal two new configuration sections:
1. Stripe Checkout Redirect
2. Stripe Checkout Redirect Fields
#### Stripe Checkout Redirect section

* **Payment Methods**: Specify which payment methods your customers can use. Select "**Automatic**" to inherit the payment methods activated in your Stripe Dashboard.
* **Success Redirect URL**: Define where customers are sent after completing their payment (your "Thank You" page). You can create a custom confirmation page using our [Confirmation shortcode](/customize-confirmation-page-pro).
* **Cancel Redirect URL**: Specify the page customers see when they cancel the payment process on the Stripe checkout page.
* **Billing Address**: Enable this option for payment scenarios that require billing address collection on the Stripe checkout page.
* Promotion Codes: Allow customers to apply coupon codes created in your Stripe Dashboard during checkout.
* **Automatic Taxes:**
Tax calculation can be complex, but it's essential for accurate payments. When enabled, taxes are calculated dynamically based on the customer's billing or shipping address. You'll need to specify the tax behavior:
* **Exclusive:** Tax is added to the base amount (e.g., $10 item + tax = $10.XX total)
* **Inclusive:** Tax is already included in the price (e.g., $10 item = $10 total)
* **Phone number**: Collect the customer's phone number as a required field on the Stripe checkout page.
* **Terms of service**: Display a terms of service link on the Stripe checkout page. Ensure you've created your Terms of Service content in the Stripe Dashboard beforehand.
* **Shipping Address Countries**: Leave empty to allow all countries, or specify which countries customers can select for shipping addresses.
* **Metadata**: Attach additional payment information (such as order IDs) that won't be visible to customers but can be used for internal tracking and reference.
#### Stripe Checkout Redirect Field Section
This section handles payment configuration by mapping pricing, customer, and product-related fields.
* **Customer email field**: Enter the form field shortcode. When specified, this email will be pre-filled on the Stripe checkout page.
* **Payment Type**: Choose from three options:
* **One-time:** For standalone purchases
* **Subscription:** For recurring subscriptions
* **Flex:** Dynamically collects either one-time or subscription payments based on conditional logic
When using Flex payment type, you can set conditions (for example, if a checkbox with ID "sub-checked" is selected, the payment will be processed as a subscription using your subscription settings).
#### One-time payment setting
Same as
#### Subscription payment setting
Same as
### Testing Your Form
After configuring your form and submission settings, test the complete payment flow. When everything is set up correctly, customers will be redirected to the Stripe Checkout page displaying all the features you've configured:
* Payment methods
* Tax calculations
* Promotion code field
* Shipping address or phone number fields
* Terms of service link
* etc.
### Monitoring Transactions
After completing transactions, view all form submissions in the transaction list page. This gives you a comprehensive overview of all payment activities.
{% hint style="danger" %}
**Important:** Webhook configuration is required for transaction reporting to function properly.
{% endhint %}
# Checkout Credit Card Form (Pro)
In this tutorial we'll walk you through creating a straightforward payment form with a credit card field. This form is designed to facilitate event registrations, Here's a step-by-step guide.
> In this sample, both the **Elementor Pro** and our **Payment Addons Pro** are required
### Create form fields
1. To begin, create a new page or post, and use Elementor for editing.
2. Next, drag and drop the Elementor Form onto your page (you can search for it using the keyword "form" or find it under the "PRO" category)

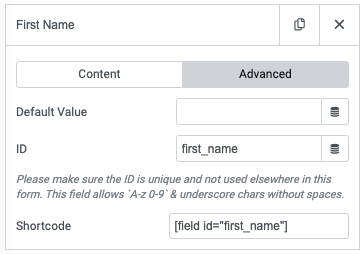
3. Add form fields one by one, such as Email, First Name, Last Name, and Event. It's important to assign meaningful **IDs** to the email and event fields, as they will be used as the customer's email and payment price, respectively. These IDs are crucial because they will be linked with **shortcodes**.


{% hint style="info" %}
You can replace the **Event** field with any field that represents a price, whether it's a fixed value like in this example or a number input field that allows users to enter a dynamic price. The key is to ensure that the field is properly linked to the payment process.
{% endhint %}
4. Add credit card field
Continue above, we can insert a **Credit Card** type field which is exclusively available for our Professional plan users

Our form UI settings are now complete and will look similar to the example below. However, the payment form is not yet complete, as we still need to add the form submission action to process payment collection.
### Form submission actions
Similar to other built-in submissions like '*collection submission'***, '***Email', 'Redirect', etc,* we provide a payment submission called \`**Credit Card submission**\` to handle the checkout-related collection.

Here we keep 'Collect Submissions' and we also add the **Credit Card submission**, the submission section will be shown below:

In this section, we can specify the supported **customer name** which can be combined by `last_name` and \`first\_name\` fields as full name, the **custom email** field that links to the email field we defined earlier, and the **Payment Type** field that consists of three options: **one-time**, **subscription**, and **flex**.
* One-time - For only standalone purchases
* Subscription - For only recurring subscriptions
* Flex - Collects either one-time or subscription based on conditional logic
When you choose a specific payment type, the corresponding settings for one-time or subscription payments will become active. For instance, if a checkbox with the ID `sub-checked` is selected during submission, the payment will be considered a subscription and will use the subscription settings.

### **One-Time Payment Settings**
If the Payment Type is chosen as One-Time or the subscription field condition is not met under Flex mode, the payment will be treated as a one-time payment. Configure the following settings:
{% hint style="info" %}
If desired, we can specify a fixed value for the **amount** field instead of using a shortcode. For instance, we can set a fixed value of 40 for the amount field.
For **Quantity** field, we set it as 1 because we don't want it dynamic, but it's free to use it as a shortcode as well.
For **Product** field, it will help to display the transaction description in the stripe dashboard so you can see which payment is for. (Tips: the form shortcode is supported for these fields.)
{% endhint %}
### Subscription **Payment Settings**
When the Payment Type is chosen as Subscription or the subscription field condition is met under Flex mode, the payment will be considered a subscription. Configure the following settings:

All of these fields support shortcodes and we can leverage them to build some customized forms with credit cards to do recurring payments:
#### Using stripe price

We recommend using predefined Stripe prices for recurring payments if the price is fixed. This allows customers to select from your existing prices in the Stripe dashboard during checkout.
The alternative is creating inline recurring payments as above section, which generates a new product and price on every transaction, even if the details are the same. This can lead to duplicated products and make inventory management more difficult.
With Stripe prices, a customer simply chooses from your listed prices, streamlining the checkout process. And you maintain one consistent product catalog in Stripe to manage pricing, inventory, and reporting.
The **Price ID** field is a list fetching from the stripe product's price list, selecting one means the check out will use this price to checkout all the time.
In some cases, the subscription price mean chosen by end-user such as in pricing-table or from a dropdown, if that so, we can specify the **Price ID field** as shortcode to make it flexible
#### Subscription occurrences
The recurring occurrences field allows specifying the number of times a subscription payment should be repeated. This is useful for temporary donation campaigns or subscriptions with a set duration.
For example, vendors could allow users to choose a 6-month, $10 per month recurring donation by adding a \[field id="donate-times"] merge tag in this field. The form would populate the number of occurrences dynamically based on the user's input.
If no value is entered, the payments will continue indefinitely until manually canceled. This flexibility supports both ongoing and fixed-duration memberships or donations.
### Testing
{% hint style="info" %}
Success: 4242424242424242 Any 3 digits Any future date
Decline: 4000000000000002 Any 3 digits Any future date
For more testing cards sample, please refer
{% endhint %}
{% hint style="info" %}
To customize the form success message, please go to form **Additional Options** section and check on Custom messages
{% endhint %}
If everything goes well, you should see the below result:
* [x] The form data will be saved in Elementor-> submission (because of the above collection submission)
* [x] The translation record will be shown in your [Stripe Dashboard](https://dashboard.stripe.com/test/payments).
**Ok, That's it!**
# Checkout Element Form (Pro)
In this tutorial we'll walk you through creating a straightforward payment form with a payment element field. This form is designed to accept multiple payment methods, Here's a step-by-step guide.
{% hint style="warning" %}
In this sample, both the **Elementor Pro** and our **Payment Addons Pro** are required
{% endhint %}
### Create form fields
1. To begin, create a new page or post, and use Elementor for editing.
2. Next, drag and drop the Elementor Form onto your page (you can search for it using the keyword "form" or find it under the "PRO" category)
3. Add form fields one by one, such as Email, Name, Quantity, and Event. It's important to assign meaningful **IDs** to the email and event fields, as they will be used as the customer's email and payment price, respectively. These IDs are crucial because they will be linked with **shortcodes**.
{% hint style="info" %}
You can replace the **Event** field with any field that represents a price, whether it's a fixed value like in this example or a number input field that allows users to enter a dynamic price. The key is to ensure that the field is properly linked to the payment process.
{% endhint %}
### Add Payment Element field
Continue above, we can insert a **Payment Element** type field which is exclusively available for our Professional plan users
Our form UI settings are now complete and will look similar to the example below. However, the payment form is not yet complete, as we still need to add the form submission action to process payment collection.
### Form submission actions
Similar to other built-in submissions like '*collection submission'***, '***Email', 'Redirect', etc,* we provide a payment submission called \`**Payment Element submission**\` to handle the checkout-related collection.
Once we select the action, two sections will show up below and I will explain them one by one:
* [x] Payment Element UI
* [x] Payment Element Submission
### Payment Element UI

#### Google Pay & Apple Pay
Whether to append wallets like Apple Pay or Google Pay within payment methods.
{% hint style="warning" %}
1\), We need to activate Google & Apple Pay in Stripe payment method setting
2\), The Apple Pay needs domain verification, you can follow the stripe guide between to verify it
{% endhint %}
#### Payment Methods
By default, the stripe checkout page will list all available payment methods in which your stripe account is activated. If you want only to allow some of them, you can choose them here.
{% hint style="warning" %}
Some of the payment methods may become unavailable if they do not support the currency.
{% endhint %}
#### Payment Methods Order
Customize the default payment method order. Unspecified methods display after defined ones (e.g. Card & Google Pay means Card first, then Google Pay and others).
#### Theme
Three themes supported so far: Stripe, Night, Flat
#### Layout
Customize the Payment Element’s layout to fit your checkout flow: Two layouts supported so far: **Tabs**, **Accordion**
#### Default Collapsed
Controls if the Payment Element renders in a collapsed state.
#### Include Radio (Only for Accordion layout)
#### Include Spaces (Only for Accordion layout)
***
### Payment Element Submission
All the configurations are the same as the Credit Card Form Submission, please refer to the form submission section for a detailed explanation:
{% embed url="" %}
# Checkout Redirect Form (Pro)
The powerful form checkout redirects to a secure Stripe-hosted checkout page and supports multiple payment methods, one-time and recurring payments, coupons, taxes, and more.
{% hint style="info" %}
In this sample, both the **Elementor Pro** and our **Payment Addons Pro** are required
{% endhint %}
### Compare with Checkout Form
Compared to the previous, this **Checkout Redirect Form** have below features:
* [x] More custom fields, such as user email, price, frequency, quantity, currency, product, etc.
* [x] More payment methods, like EPS, Giropay, Sofort, iDeal, Alipay, Apple/Google Pay, WeChat.
* [x] Using a secure Stripe-Hosting checkout page that can be customized with your Brand.
* [x] One-Time & Recurring Pay.
* [x] Coupon, Stripe-Tax.
{% hint style="info" %}
**The webhook is required** if you want to either send the native Elementor form email or save the submission to the database.
{% endhint %}
### Create Form Fields
1. To get started, create a new page or post, and edit it using Elementor.
2. Next, drag and drop the Elementor Form onto your page (you can search for it using the keyword "form" or find it under the "PRO" category)
3. Add form fields one by one, such as Email, Quantity, Price, etc. It's important to assign meaningful **IDs** to the email and event fields, as they will be used as the customer's email and payment price, respectively. These IDs are crucial because they will be linked with **shortcodes**.

### Form submission actions
Similar to other built-in submission options such as 'Collection Submission', 'Email', and 'Redirect', we offer a payment submission called the **`Checkout Redirect Submission`** to manage the checkout-related collection process. Once this action is added, two new sections will appear: the **Stripe Checkout Redirect** section, which provides payment-related information, and the **Stripe Checkout Redirect Fields** section, which allows for easy field mapping with forms using shortcodes.


### Testing
{% hint style="info" %}
Success: 4242424242424242 Any 3 digits Any future date
Decline: 4000000000000002 Any 3 digits Any future date
For more testing cards sample, please refer
{% endhint %}
When you click the submit button, you will be redirected to a secure checkout page hosted by Stripe, where you can complete your transaction using the testing account provided above.
Once you have filled in the payment information and clicked the 'Subscribe' button, you will be redirected to the 'Success' page that you configured in the previous section. On this page, you can reuse your [Confirmation Summary](/elements/confirmation-summary) widget to collect payment receipt information.
# Email Configuration
How to set up email notifications and customer invoices for your payment.
In most cases, site owners want to receive notifications during payment processing, such as when a payment is successful or failed, and even do some automation tasks with email.
### Prerequisites
* [x] WP SMTP provider works
* [x] [Webhook Configuration](/getting-started/webhook-configuration)
### Supported Emails
We currently offer notifications for three event types:
* Payment Succeeded
* Payment Failed
* Customer Invoice
These can be enabled/disabled and customized individually to match your site's style. Let us know if any other email notifications would be helpful for your workflow and we'll consider adding them.
{% hint style="info" %}
When specifying recipient(s), you can enter multiple emails separated by commas. For example:
{customer.email},
{% endhint %}
### Supported merge fields:
The following merge tags can be used to dynamically insert data into the email content:
> **Note**: Some fields may be empty depending on the payment type - for example, shipping details may be empty if no shipping required when collect payment information
```
{site_title}
{site_url}
{header_text}
{amount}
{description}
{currency}
{created}
{format_date}
{format_time}
{amount_currency}
{matedata}
{payment_method.type}
{payment_method.card.brand}
{payment_method.card.last4}
{customer.name}
{customer.email}
{customer.phone}
{customer.address.country}
{customer.address.state}
{customer.address.city}
{customer.address.line1}
{customer.address.line2}
{customer.address.postal_code}
{billing_detail.address.country}
{billing_detail.address.state}
{billing_detail.address.city}
{billing_detail.address.line1}
{billing_detail.address.line2}
{billing_detail.address.postal_code}
{shipping_detail.address.country}
{shipping_detail.address.state}
{shipping_detail.address.city}
{shipping_detail.address.line1}
{shipping_detail.address.line2}
{shipping_detail.address.postal_code}
{error.message}
{receipt.url}
{payment_intent_id}
```
### Metadata merge field (Pro Only)
Metadata is a powerful feature that allows you to store all the submitted form data, which can be leveraged to populate email templates with field names. This information can also be found in the Stripe Dashboard.
{% hint style="info" %}
The **{metadata}** is a formatted key-value string including the specified metadata (for checkout redirection) or form values (for payment form)
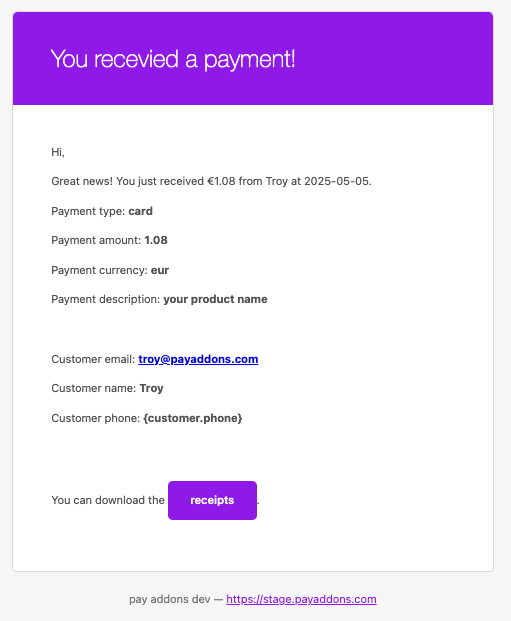
We can split them by giving an existing key. For example, if a form id key is called 'first\_name', we can use it in email as **{metadata.first\_name}**
{% endhint %}
### Customize Default Template Colors (Pro Only)
We provide a default template for email notifications, but you can easily customize its theme to match your brand’s colors. The following color settings are available:
* **Base Color**: `#4a90e2`
* **Background Color**: `#f7f7f7`
* **Body Background Color**: `#ffffff`
* **Body Text Color**: `#3c3c3c`
{% hint style="success" %}
The body content remains unchanged and can be configured in the email content editor (available for all three email types).
{% endhint %}
Once you unlock this feature, you’ll see the **Customize Email Template** section, where you can modify the supported colors.
To style button links as shown above, switch the editor to **Code Mode** and add the class `button` to your link:
```html
View Receipt
```
### Override the Default Template Layout (Pro Only)
If you want more control over your email template—beyond just colors—you can fully customize the layout, including headers, footers, and other structural elements.
To override the default template, place an HTML file named `default.html` in your theme folder at:
**{themefolder}/elementor-pay-addons/emails/default.html**
This custom template supports all email and payment merge fields.
A special merge field, `{{__email_body__}}` (wrapped in double braces), is reserved for dynamic content replacement. This ensures the email body you configure in the editor is automatically inserted into your custom template.
```html
{{__email_body__}}
```
A full example file:
payaddons custom template
```html
Thanks for submitting your account information.
You're now ready to make live transactions with
Stripe!
{{__email_body__}}
— The payaddons dev team
Stripe, 354 Oyster Point Blvd, South San Francisco, CA
94080
```
# Decimal Form Field (Pro)
A decimal type field for Elementor form
When building payment forms in Elementor, collecting numeric amounts can be tricky with the standard field types. The "**text**" type doesn't validate numbers, while the "**number**" type only allows integers.
To solve this common need for decimal payment values, we added a dedicated "**Decimal**" field in our plugin.
This new field type only allows valid numeric decimal entries like 9.99. It will validate values entered are in the proper format - preventing invalid text or improperly formatted decimals.
# Customize confirmation page (Pro)
Redirect to your custom a Confirmation or Thank you Page with receipt Information after payment
As you may know, we currently offer a[ **confirmation summary**](/elements/confirmation-summary) element that displays a summary of the user's payment details after they complete a transaction. However, this section has a fixed design, allowing only limited customization of its styles. In many cases, users request the ability to display a fully customized confirmation or thank-you page.
To address this, we now provide a receipt shortcode that allows you to design a confirmation page that seamlessly aligns with your site's style and branding. This feature gives you the flexibility to create a completely tailored experience for your users.
### Redirect to a Custom Confirmation Page
#### 1. Create Your Confirmation Page
Create a new page where you want to display the detailed payment confirmation.
#### 2. Add the Receipt Shortcode
Insert the following shortcode into your page:
```
[epa-receipt]
```
#### 3. Insert merge fields
You can customize your confirmation page by incorporating various supported tags to display transaction details such as by using the below-supported merge fields:
Insert any of the below tags into your HTML pages:
```
{description}
{amount}
{currency}
{format_date}
{format_time}
{amount_currency}
{customer.email}
{customer.name}
{customer.phone}}
{customer.address.country}
{customer.address.state}
{customer.address.city}
{customer.address.line1}
{customer.address.line2}
{customer.address.postal_code}
{billing_detail.email}
{billing_detail.name}
{billing_detail.phone}
{billing_detail.address.country}
{billing_detail.address.state}
{billing_detail.address.city}
{billing_detail.address.line1}
{billing_detail.address.line2}
{billing_detail.address.postal_code}
{payment_method.type}
{payment_method.card.brand}
{payment_method.card.last4}
{receipt.url}
```
#### 4. Metadata merge field (advanced)
Metadata is a powerful feature that allows you to store all the submitted form data, which can be leveraged to populate templates with field names. This information can also be found in the Stripe Dashboard.
{% hint style="info" %}
The **{metadata}** is a formatted key-value string including the specified metadata (for checkout redirection) or form values (for payment form)
We can split them by giving an existing key. For example, if a form id key is called 'first\_name', we can use it in email as **{metadata.first\_name}**
{% endhint %}
### Example overview
To implement a basic confirmation page, add a Custom HTML block with your desired layout. Here's a sample template:
```html
```
### Configure Success URL
All of our elements and forms are designed to allow you to specify a success redirection. You can easily assign your custom confirmation page by setting it as the success or return URL.
# Developer APIs
Leverage our built-in APIs or WordPress filters for some advanced usages
### WordPress Filters
{% code overflow="wrap" %}
```php
apply_filters( 'elementor_pay_addons/forms/record/actions_before', $record, $this )
apply_filters('elementor_pay_addons/api/checkout_session_args', $session);
apply_filters( 'elementor_pay_addons/webhook/event', $event);
apply_filters( 'elementor_pay_addons/form/create_customer', $customer_params );
apply_filters( 'elementor_pay_addons/form/create_payment_intent', $payment_intent );
apply_filters('elementor_pay_addons/form/create_subscription', $subscription_params);
apply_filters( 'elementor_pay_addons/form/create_checkout_session', $checkout_session );
apply_filters('elementor_pay_addons/email/format_string', str_replace($find, $replace, $string), $this);
apply_filters('elementor_pay_addons/email/headers', $header, $this->id, $this->object, $this);
apply_filters('elementor_pay_addons/email/from_name', get_option('epa_email_sender_from_name'), $this, $from_name);
```
{% endcode %}
### Access Stripe Instance in front-end JS
{% hint style="danger" %}
Make sure to fetch the form handlers after DOM is ready.
{% endhint %}
Let's say you want to get Stripe [payment element](https://docs.stripe.com/js/element/payment_element) in [Checkout Element Form](/elements/checkout-element-form-pro):
{% code overflow="wrap" %}
```javascript
jQuery('.elementor-widget-form')[0].epaFormHandler.stripeElement.getElement('payment')
```
{% endcode %}
Let's say you want to get Stripe [card element](https://docs.stripe.com/js/elements_object/create_element?type=card) in [Checkout Credit Card Form](/elements/checkout-credit-card-form-pro):
{% code overflow="wrap" %}
```javascript
jQuery('.elementor-widget-form')[0].epaFormHandler.stripeElement.getElement('card')
```
{% endcode %}
Then we can execute the Stripe native method such as update in the front end.
{% code overflow="wrap" %}
```javascript
jQuery('.elementor-widget-form')[0].epaFormHandler.stripeElement.update({ amount: total });
```
{% endcode %}
# Dynamic Tag PHP
When pricing or quantity requires complex calculations, our Dynamic Tag feature lets you run PHP code directly within payment fields.
{% hint style="danger" %}
This feature requires the Elementor Pro license
{% endhint %}
### Inserting a PHP Dynamic Tag in Payment Fields
Follow these steps to implement a dynamic PHP tag in your payment form:
1. Create an Elementor form and add your desired payment field (such as credit card).
2. In the "Actions After Submit" list, add "Credit Card Submission". This will display the Credit Card Submission tab where all your payment settings are located.
3. Click on the Amount field's dynamic tag button, then scroll down the list of available tags until you find "Code(php)" in the Elementor Stripe Addons category.
4. Click the gear (settings) button to write your PHP code. Ensure that your code returns a numeric value representing the final quantity. For example:
```
return 2*5;
```
### Testing Your Dynamic Tag
With the configuration shown above, you can see how dynamic values affect your payment processing:
* The amount is fixed at €19.90
* The quantity is dynamically calculated by our PHP code, which returns a value of 10
* Therefore, the total price charged would be €199.00 (€19.90 × 10)
This feature gives you powerful flexibility when dealing with complex pricing scenarios in your Elementor forms.
# Dynamic field by request parameter
When pricing or quantity requires pre-fill values from request parameters such as URL, our plugin supports retrieving these values and filling them directly into payment fields.
### How to Use a URL Query Parameter as a Payment Price
The core idea is to add a hidden form field and leverage Elementor Dynamic tags with Request Parameters to prefill values from the URL. Then, in your payment settings, you can use **shortcodes** to link the form value with your payment process.
### Step-by-Step Instructions:
1. Create a hidden field for the amount or even the price ID for a subscription
2. Given a meaningful field ID and click the dynamic tag icon in the Default Value input box
3. Choose **Site → Request Parameter** from the dynamic tag list and select GET type
4. Copy the generated shortcode, then in the "Actions After Submit" list, add "Credit Card Submission" - this will display the Credit Card Submission tab where all your payment settings are located
5. Find the amount field in the payment settings and paste the shortcode.
### Testing by giving an amount parameter in the URL
Test your setup by adding a `amount` parameter with a value in the URL, such as: